
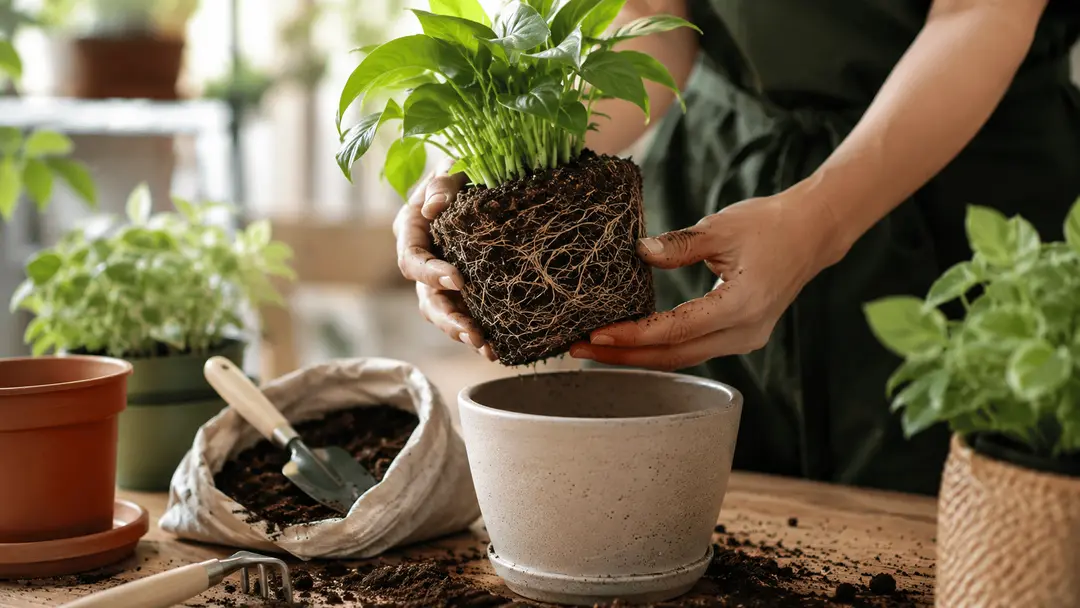
Repotting is a vital rite of passage for any thriving houseplant, but for many plant parents, the fear of disturbing the roots can make the process feel incredibly intimidating. However, moving your green companion to a roomier home doesn't have to be stressful. With the right technique, you can upgrade your plant's living space seamlessly while keeping its delicate root system perfectly intact.
In this comprehensive guide, we will break down exactly when to make the move, walk through a gentle step-by-step repotting process, and explore how to ensure a smooth recovery.
When Should You Repot a Plant?
Timing is everything. Moving a plant at the wrong time can cause unnecessary shock. The absolute best time to repot is during the spring or early in the growing season. This is when your plant is bursting with natural energy, allowing it to recover quickly and anchor itself into its new environment.
Pro-Tip: Unless it is an absolute emergency (like severe root rot), avoid repotting a plant that is currently flowering or already showing signs of heavy environmental stress.
The Gentle Step-by-Step Repotting Guide
Follow these six simple steps to ensure your plant transitions to its new home safely and without a hitch.
Step 1: Water Before You Start
Never repot a completely dry, thirsty plant. Water your plant thoroughly a day before you plan to move it. Moist soil naturally holds together around the root system and acts like a protective cushion. It allows the entire rootball to slide out smoothly, drastically reducing the risk of tearing delicate root hairs.
Step 2: Choose the Right Pot and Soil
Size matters! Always pick a new pot that is just one size larger—roughly 2 to 5 cm wider than the current one—and ensure it has adequate drainage holes. Moving a plant into a massive, oversized pot means excess soil will sit wet for too long, which quickly invites root rot. Fill your pot with a fresh, well-draining potting mix heavily enriched with compost to give your plant a nutrient-dense foundation.
Step 3: Remove the Plant Gently
Instead of pulling the plant forcefully by its stem (which can snap the roots or damage the delicate crown), tip the pot sideways. Support the base of the plant with your hand and gently ease or wiggle it out. If it feels stuck, run a dull knife carefully around the inside edge or squeeze the sides of the pot if it is flexible.
Step 4: Loosen the Roots Carefully
Once the plant is out, inspect the rootball. Use your fingers to gently tease apart any circling or tightly matted roots so they know it’s time to spread outward. If you find dead, mushy, or completely tangled roots, trim them away using clean, sterilized scissors.
Note: If you notice signs of root rot (mushy, foul-smelling black roots), clip them away and dust the remaining healthy root system with a mild fungicide before proceeding.
Step 5: Replant at the Right Depth
Layer some fresh soil mix at the bottom of the new pot, position your plant right in the center, and fill the sides with soil, firming it down gently with your fingers to eliminate large pockets. Be careful with your depth: burying the stem too deep invites rot, while planting it too high exposes vulnerable roots to dry air. Keep it at the exact same depth it was living at before.
Step 6: Essential Aftercare
Give your plant a thorough watering right away to help settle the fresh soil and eliminate hidden air pockets. Keep the plant out of harsh, direct sunlight for a few days while it adjusts. Hold off on any heavy fertilizers initially; fresh soil mix is already loaded with nutrients, and stressed, adapting roots cannot handle heavy synthetic feeding. A gentle organic bio-stimulant can be used instead to help roots re-establish.
Key Signs Your Plant Has Outgrown Its Home
Knowing when to step in is half the battle. Keep an eye out for these telltale signs that your plant is craving a bigger space:
-
Roots are noticeably circling the top surface of the soil or poking aggressively out of the bottom drainage holes.
-
Water runs straight through the pot without actually soaking into the soil.
-
The soil dries out incredibly fast, requiring you to water multiple times a week.
-
The plant's growth has suddenly stalled or completely stopped during the active growing season.
-
The plant looks top-heavy and keeps physically toppling over.
Helping Your Plant Recover
The first two weeks following a move are when your care matters most. Some mild wilting or slight drooping is entirely normal—this is just standard transplant shock and typically passes within a week or two.
Keep your newly potted plant in a bright area but completely shielded from harsh sun, maintain steady (but not soggy) moisture, and resist the urge to move it around or disturb it. Let the roots peacefully anchor into their new home, and once you spot the very first sign of fresh, new green growth, you can safely return the plant to its usual location and resume your normal seasonal liquid feeding routine.

.jpg)
.jpg)